TRAIN TRACK® includes many built-in features designed to make it easier to find, sort, and edit records. You may use the Find or Sort functions on any field on any screen. Each screen includes either a scroll bar to navigate through the recordset, or navigation buttons at the bottom of the screen to page through the records. Data is automatically saved as soon as you move to the next record. You may also use the standard Cut, Copy, Paste, and Undo functions. You may add or delete records, as well as edit them.
Special functions in TRAIN TRACK® include the ability to jump to a related record. Any time you see an employee name on your screen, double-click on it to open the employee record. Any time you see a training title, double-click on it to open the training record. You may also double-click on a job title, department, shift, location, or employee type to open those records. This allows you to quickly open a related record.
Many screens also allow you to re-arrange and re-size columns, sort by multiple columns, and change the font and background color. Primary screens will automatically re-size to fit your screen.
Sorting Records
To sort records on any screen by any field, follow these steps:
Or you may follow these steps:
After sorting records, click Save from the menu bar and your sort order will be saved for the next time you return to that screen (open database edition only; this feature is not available in the standard edition).
Scan Barcodes
To easily record training completion data, take the completed sign-in sheets to a workstation equipped with a barcode reader.
To record completions by scanning the barcodes, follow these steps:
As you scan each code, you will see the employee name displayed on the screen. If you need to make any corrections, you will see the entire list of scanned records and you may edit them before saving the records.
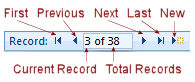
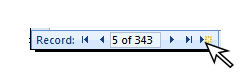
Record Navigation
To scroll through records, use the navigation bar at the bottom of the screen.
Jumping to Related Records
Double-click on a Training Title to jump to that training record. Double-click on an Employee Name to jump to that employee record. Double-click on a Job Title, Department, Shift, Location, or Employee Type to open those records.
Adding Records
To add a new record, click New from the navigation buttons at the bottom of the screen.
Duplicate Records
If the program recognizes a duplicate employee, training, or training completion record, it will alert the user and not allow the record to be added.
Deleting Records
Some screens include a red "X" to allow you to delete the record. When you see the "X", you may click on it to delete the record. You will be asked to confirm the deletion. In most cases, once you delete a record, you will not be able to restore it. The exception is for training records and employee records which can be restored from the audit trail menu.
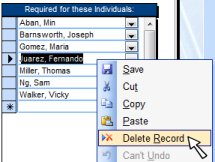
For screens without an "X" where records can be deleted:
To delete a record, follow these steps:
To delete all records with the status "Inactive", go to the Start Menu, Tools tab.
Undoing Changes
To undo a change, right-click and select Saved Record, or select Undo from the Menu Bar.
Arranging Columns in List View
On some of the list view screens, you may re-arrange the columns, re-size the columns, and sort the records by multiple columns. Screens with these features:
To re-arrange columns, follow these steps:
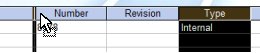

To sort by multiple columns, follow these steps:

To re-size the columns, follow these steps:
To select font, background color, and row height, follow these steps:
After arranging records, click Save from the menu bar and your changes will be saved for the next time you return to that screen (open database edition only; this feature is not available in the standard edition).
Linking Documents
You may link any type of document or file to each training record, employee record, or training completion record. To do this, right-click on the link field and select "Hyperlink", then browse to the file you wish to link.
If you are going to have a large number of linked documents, we recommend that you place all of the documents in a folder within the TRAIN TRACK® folder. This way, if you need to move the program, you can just move the entire parent folder and your links will not be broken. You will be able to store the links as relative links (relative to where the program file is located). For example, if you created a folder called "docs" within the TRAIN TRACK® folder, your link would look like this:
Please make sure your folder names and file names do not contain any spaces, as hyperlinks to a network location will not work if there are spaces. If the hyperlinks point to a web address, then you may use the percent symbol (%) to represent a space.
Page updated 6/25/2013