SECURITY AND USERS
TRAIN TRACK®
comes with built-in security measures; however, your database should also
be stored on a secure network, and only those with permission to use the application
should have access to it through your network.
User Levels
The program offers a wide variety of user access levels. You may assign each person a user access level. In the client/server edition, you may also restrict the employees they are able to view or edit.
Each user may be assigned an access level:
- Administrator: edit all records, and also edit users and user levels.
- Standard: edit all records.
- Completions: view all records, but may only edit training completions.
- Read-only: view all records, but may not edit any records.
- Exam: view their own training status, or to take exams, and open attached documents associated with the exams.
Each user may also be assigned an employee recordset (in the client/server edition):
- All employees
- Their subordinates
- One department
For example, you may assign a read-only user the ability to view only one department, or you could assign a completions user the ability to only edit training completions for their subordinates.
|
Edit users |
Edit records |
Edit completions |
View records |
View their own training status |
Take an exam and open attached documents |
License required |
| Administrator |
Yes |
Yes |
Yes |
Yes |
Yes |
Yes |
Yes |
| Standard |
- |
Yes* |
Yes* |
Yes* |
Yes |
Yes |
Yes |
| Completions |
- |
- |
Yes* |
Yes* |
Yes |
Yes |
Yes |
| Read-only |
- |
- |
- |
Yes* |
Yes |
Yes |
- |
| Exam |
- |
- |
- |
- |
Yes |
Yes |
- |
* For all records, just their subordinates, or just one department.
The web-based user interface allows you to set up a separate set of users.
Edit
Users
To edit user names and
levels, you need to be logged in as an administrator. If you are unable to log in as an administrator, you may still edit users if you have the original registration code (see Lockout Recovery below).
To edit users, follow these steps:
- Open any screen.
- From the Navigation Panel to the left, select Start Menu.
- On the Start Menu, select the Setup tab.
- Click Edit Users.
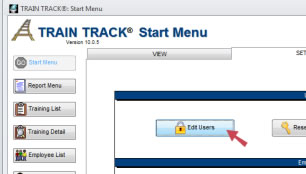
- The Edit Users screen will open.
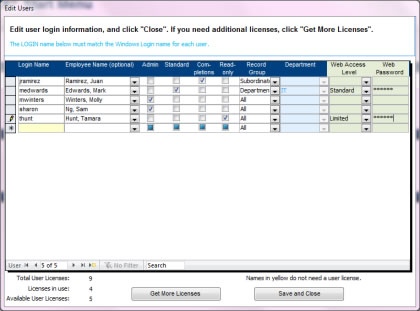
- Enter the Windows Login Name for each user. This is the name they use when they first start their computer and log in to Windows.TRAIN TRACK® is able to capture the name of the user currently logged in to the computer, and compare that name to this list of users. This allows you to start the program without entering a separate user name and password. The program will not let you in if you have not already entered a correct user name and password when you logged in to Windows. This way, all security rules you have set up for your network are automatically applied to this program, such as required character length and expiration dates. Any time you are logged in to the program, your login name will be displayed on the screen (usually in the bottom left corner).
- Select the related employee name. (Optional. This is how the correct subordinates are linked to the user.)
- Check the box under Admin, Standard, Read-Only, or Completions for the appropriate level of access.
- Select the employee Record Group (all, department, or subordinates) you wish to give them access to. If you select Department, then pick the department from the list.
- Enter a web user name and password, if you also wish to give them access to your web interface (if applicable).
- Click Save and Close.
The user names that are highlighted in yellow are users that do not require a user license. If the total number of users requiring a license is greater than the number of users you are licensed for, you will be asked to remove some users.
If you make changes to the level of the user that is logged in to the program, you will need to close and re-open it for your changes to take effect.
Password Administration
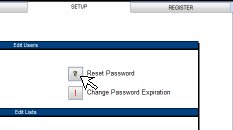
To reset a password, follow these steps:
- Open any screen.
- From the Navigation Panel to the left, select Start Menu.
- On the Start Menu, select the Setup tab.
- Click Reset Password.
- The Reset Password screen will open.
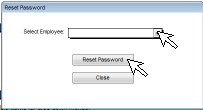
- Select an employee from the list. Note: the list will only include employees who have already set their password.
- Click Reset Password.
- A message box will ask you to confirm resetting the password.
To change password expiration, follow these steps:
- Open any screen.
- From the Navigation Pane to the left, select Start Menu.
- On the Start Menu, select the Setup tab.
- Click Change Password Expiration.
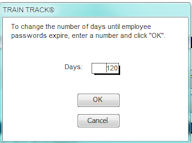
- A dialog box will open.
- Enter the number of days until passwords will expire.
- Click OK.
Associate Supervisor Users with their Employees
In order to assign users to view only their subordinates, you need to associate their user login name with their name from your database, and select them as the supervisor for their employees.
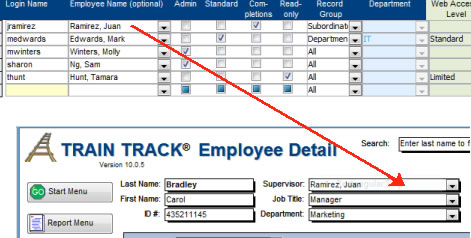
In the above example, user Juan Ramirez would see records for his employee, Carol Bradley, when he logged in.
To associate a supervisor with an employee, follow these steps:
- From the Edit Users screen, type in the Login Name.
- Select the Employee Name.
- From the Employee Detail screen, locate a subordinate employee, and select the Supervisor name.
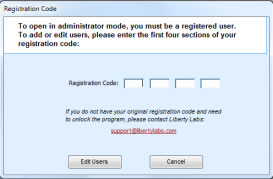
Lockout Recovery
If you are unable to get to the Start Menu, and instead see the login box for the Exam Menu, this means your Windows® login is not listed as an administrator user. To edit users in this situation, if you have the original registration code, you may use the lockout recovery function.
To edit users if you are not listed as an administrator, follow these steps:
- If you are able to log in, but not designated as an administrator, from the Start Menu, Setup tab, click Edit Users.
- A message box will indicate that you are not an administrator, and ask if you want to edit users with the registration code.
- Click Yes.
- A box will open. Enter your Registration Code that came with your license.
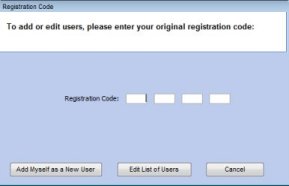
- Click Edit List of Users.
To edit users if you are not listed as a user, follow these steps:
- If you are not listed as a user at all, and only able to log in to the Exam screen, click Open TRAIN TRACK in Administrator Mode.
- A box will open. Enter the Registration Code that came with your license.
- Click Edit Users.
Auto Shutdown
The program will automatically shut down if it has not been used for several minutes. You may determine the number of minutes until the program shuts down.
To configure auto shutsown, follow these steps:
- From the Start Menu, Database tab, click Auto Shutdown.

- The auto shutdown window will open.
- Enter the number of minutes after which you would like to program to alert the user if there is no activity.
- Enter the number of minutes after which you would like to program to shut down if there is no activity (this should be greater than the first number).
- Click OK.